
The first time I hear about =SUMIFS() was at the computer literacy class in college. The instructor tried using some data in Excel to illustrate how it works, but just like most of the class, I had no clue about why this formula matters. It was just like trigonometry to me; you heard of it in high school, but apart from exams, you never used it again.
Things started to change when I started my first internship out of college. My first task was to paste data to a team Excel workbook and send a daily table to my manager. I frowned upon complicate=SUMIFS() formula and realized this is something I need to know in my life.
Long story short, this is my journey to understand =SUMIFS(), one of the fundamental blocks of Excel, and I want to share this to help people who feel frustrated about this formula right now.
Let’s start with a simple example: A grocery shop transaction log, listing which customers purchased what. Now the shop owner wants you to tell him how much he made from selling Toilet Rolls.
In Excel, the key mindset here is a questioning mindset. The questioning mindset helps you identify what is needed (question), and guide you through what formula is required to create the result (answer).
Question: Revenue for selling Toilet Rolls
Answer: Add up revenue in column G for things that say “Toilet Roll” in column D
How do we tell Excel to do exactly what we need? We can first try to sum exactly what we need: cells G2 and G9.

That’s a 50/100 answer. Why? Imagine instead of 10 rows, you have 1,000 rows. It is just impractical to do =G2+G9+G12+G18+…+G982. In these cases, the powerful =SUMIFS() formula kicks in to save the day.

=SUMIFS(sum_range, criteria_range1, criteria1,…)
“sum_range” just means the numbers to add up, so naturally, it is the Revenue column (column G), same as how we add G2 and G9. “criteria_range1” tells Excel to ONLY add up numbers that satisfy what we want in “criteria1”. We want to add items in column D that says “Toilet Rolls”, so we put column D as “criteria_range1” and “Toilet Rolls” as “criteria1”.
Now that’s a 95/100 answer. What’s even better? Now instead of Toilet Rolls, the shop owner wants to know the total revenue for Pasta. Can you think of a better way to write this formula?
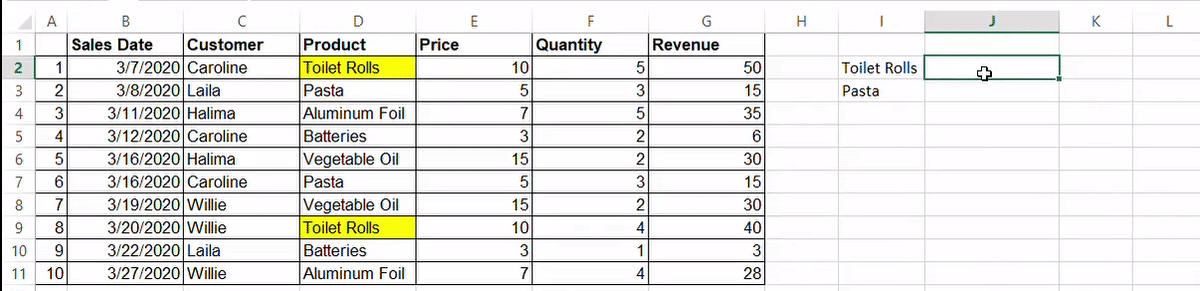
Let’s examine why our formula worked. We put cell I2 as “criteria1”, and when Excel does its magic, it KNOWS that “criteria1” (cell I2) is “Toilet Roll”, and gives us what we need.
Summary: =SUMIFS() adds up numbers for you based on a given condition. If you ever forget what it does, remember that some shop owner needs to know how much they made on Toilet Rolls.
If you don’t get in the first time, there is no need to panic! Fun fact: It takes at least 20 hours to learn and grasp something new, so you are totally fine if you don’t get it the first time. Let the knowledge sinks in, and give it a try using the workbook available on this link!
Ready for something more advanced? Check out Part 2 of this article! Do you find the =SUMIFS() tutorial useful? If you want to read more from us, don’t forget to subscribe to our newsletter and follow us on our official Instagram account!